I figure there is no better place to start my nature photography lessons then with what I believe is the single most important piece of equipment; a tripod. I have written about this before, and at the risk of sounding repetitive and redundant, 🙂 I would like to repeat the numerous advantages:
- Typically it will give you sharper images.
- It can allow you to use lower iso settings or slower speed film which in general can improve the quality of your images.
- A tripod allows you to use slower shutter speeds, which can allow you to use smaller apertures in order to increase your depth of field if desired.
- The biggest advantage to me is a tripod forces you to slow down and really study your composition. It also gives you time to look around the entire frame for distractions, giving you the ability to fine tune your composition. When you hand hold, the camera is always moving a little. That distracting branch may not have been in the frame the last time you looked in the lower right corner, but by the time you hit the shutter, it now might be included.
A common mistake, and one I made myself, is to buy a flimsy, inexpensive tripod. Most cheap tripods won’t properly support your camera, nor will they last very long. I believe it is worth spending the money up front for a sturdy tripod.
Like a lot of photography gear, a sturdy tripod can be expensive, but they do last a long time. For many years I used an aluminum Bogen 3221 – now the Bogen 055. I have gone through two of them, they seem to last for a good five years of constant use before scratches, dirt and dents get the better of them – I should add, I tend to be rough on tripods.
You can get a Bogen 055 for about $190 bucks for just the legs. The head is extra and the subject of the next lesson. They come in a few different flavors as notated by the letters after the 055 in the model number. Some have retractable spikes, a center column that can be positioned horizontally, etc. I like the basic model, partly because you can spread the legs and lower the tripod to a minimum height of 3.2 inches.
A little over a year ago I finally upgraded to a carbon fiber Gitzo and I really love it. The carbon fiber is much lighter, about half the weight of a similar aluminium. In addition it is quieter and studier. I also like the carbon fiber in the cold weather, they are much easier on the hands then aluminum. The drawback, you may have already guessed, is the cost. A tripod with a similar holding capacity as the Bogen 055 costs almost $600 for just the legs.
I use a Gitzo 2530. It has 3 leg sections, they make a similar one with 4 sections per leg. The 4 is slightly slower to set up, but folds down to a smaller size. The 2530 is fine for 35mm lenses up to 100-400. Because I have a separate tripod for my large telephoto lens, the 2530 was a perfect size for my everyday tripod. For a comparison, The Bogen 055 weighs in at 6.1 pounds, the Gitzo 2530, 3.1 pounds. If you plan to use heavier lenses, then I would recommend the studier Gitzo 3530. The 3530 is a very popular tripod because it can support almost 40 pounds of equipment, and yet only weighs 4 pounds.
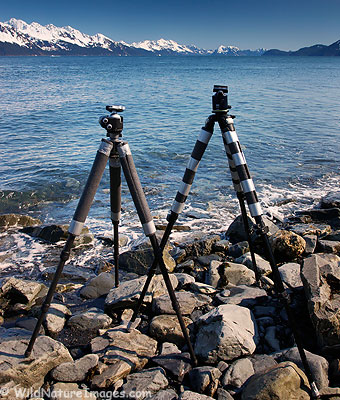
If you notice in the picture I wrap my legs with 1.5 inch sections of pipe insulation and duct tape. It looks a little ugly, but serves a few purposes. For one, it is easier on the hands on a cold morning. It is quieter – the banging of legs as you close up the tripod to move closer to wildlife can spoke wildlife – the insulation muffles that sound.
But most importantly, the insulation helps soften the load on the shoulders. When the photography is good, I think most photographers prefer to keep their cameras out of the bag and on the tripod. One of the easiest ways to carry this combination is on one shoulder, and the foam insulation sure helps.
I have seen a tripod leg protection product being marketed like this one by LensCoat. I’m sure they do a fine job and look a lot nicer, but it costs a lot more then some pipe insulation and duct tape.
For reference, in the above photo, the Gitzo is on the left, and the Bogen on the right.
The next lesson will cover tripod heads. More specifically, ball heads.
Next: Ballheads


Comments 8
Like I said before, I’m not a photographer, but I find the information quite interesting. Especially how you wrap the tripod in duct tape, ( the fix for everything, huh? ) so that you can move in on wildlife more quietly. You have some pretty cool pictures of bears. Are they hard to take pictures of them in the wild? I know a lot of photographers use animal farms, taking pictures from cars, etc… Have you ever done that, and if not how hard is it to take these photos?Do you use a long lens? You & Janine stay safe!!
Author
Hi Beth,
Thanks.
You know I have never been to a game farm, and really hate the idea of animals being kept in cages so they can be photographed, but that is a different discussion. Unfortunately, they are becoming more and more popular.
Surprisingly bears aren’t as hard as you might think if you go to National Parks where they aren’t hunted. In a place like Denali, bears will walk by without even looking at you; you might as well be a tree or something. They have learned there is no reason to fear humans. Now in areas where they are hunted, they are much more skittish and unpredictable.
Having said that, I also use a giant telephoto lens. No point in getting any closer then necessary 🙂
Ron
Great insights Ron.
A couple of things that I have found in my photo experience too:
* Joby.com has a “Gorilla Pod” which has small, articulating (twisty) legs that allow you to mount it to whatever you like – if you have a smaller camera/lens, they work great. The jumbo variety claims to handle bigger lenses, but as I’ve got a D80 with battery grip and a 18-200 lens, I always feel like I have just a bit too much weight. I have a second mini-pod for a point-and-shoot that both camera and pod can fit in a pocket. Very nice.
* I use the insulation padding too! Though duct tape is the quintessential on-the-fly fix-it tool, I like to use black electrical tape – it blends in pretty well with the color of the insulation which means I’m not shy of taking it to a more fancy setting (say, a wedding). If I were to do it over again, I might consider using a wrap of duct tape covered by a couple wraps of gaffers tape – that stuff is great to hold things in place; plus the adhesive doesn’t leave a residue so it can work well with photo stuff.
* Lastly, I really liked the tips offered by Scott Kelby in his Digital Photography I & II books which included $, $$, and $$$ varieties of tripods/heads for varying budgets. Might be worth a looksie.
Thanks for continuing to share your photos and insight!
-Cody
Author
Hi Cody,
Thanks a lot for the tips!
I’m not familiar with the Gorilla Pod, I will have to look that up.
It is hard to beat duct tape, especially since I always have some laying around. I had just ordered some gaffers tape last week, should be here any day, I’m looking forward to giving it a try.
Sounds like Scott Kelby has a great system for his recommendations – I will have to check them out. I’m surprised at how quickly things change when it comes to equipment!
Thanks Cody,
Ron
Great way to start off this series Ron. Your old tripod is heavy but the carbon fiber sounds good.
Great job Ron – starting with the basics, I think this adventure will be great for all, if not to learn, than to be reminded.
This is going to be a wonderful series Ron. Lots of writing, but good stuff.
Mom
Author
Thanks everyone!