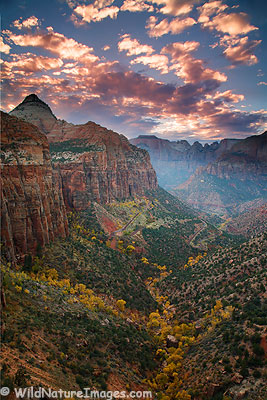
Zion Canyon Overlook, Utah.
When I’m traveling, the photos I post here on the blog are ones that take little work. Now that I’m back in the office, I have the computer and time to spend on some of the more difficult photos.
In this scene, the sky was a good 3 stops brighter then the canyon. I tried using a 3 stop graduated neutral density filter, but the horizon wasn’t even enough. So I ended up taking a few different exposures, and combining the different exposures in Photoshop. This is my first attempt
Here are more Zion National Park, Utah photos.


Comments 10
this looks like a difficult exposure. 🙂 is this the shot you were aiming for from the Angel’s Landing hike?
Author
Yes it is, although I had hoped to get the full moon rising as well from Angel’s Landing.
This is a far easier hike the Angel’s Landing.
As always with your work, great photo. Assuming you are using HDR features in Photoshop CS3 for this photo, do you have enough experience yet to comment on HDR CS3 versus HDR CS2? Then how about HDR CS3 versus Photomatix (I found your blog this summer from a search on Photomatix)?
Author
Thanks Waren,
That is an excellent question, and something I am revisiting myself, and will likely post about further in the next month or two. I tried using Photomatix on this image – it is fast and easy, but I find the results are often a little over the top for me – they tend to have that “HDR look”.
Photoshop has made great strides in this area with CS3. I haven’t been using the Merge to HDR function, I prefer the Photomerge option. I then unselect the “blend images together option” so that I end up with the different exposures on different layers. I then use a layer mask to blend the two exposures – I like having so much control. I think Photomerge does a great job at matching up the different exposures, so then it is just a matter of masking. I hope to expand on these comments after the beginning of the new year.
Ron
Thanks Ron. CS3 is going on the holiday wish list. Looking forward to the how-to article after the first of the year… and you guys finishing the MAJOR remodel you’ve undertaken. Oh but you are going to enjoy it when finished.
Author
I hope so! 🙂
Howdy Ron –
Welcome Back to the AK !
My two cents on the HDR question – Photomatix 2.5.4 will give you a batch processing option resulting in an HDR file and/or an Enhanced TIF file of the combined images. Usually, you can take the TIF file and tweak it a bit more in PS2 or PS3 and get the desired effects – however, if you run the batch process in Photomatix straight on your RAW files, you will be able to open the resulting TIFs in Camera Raw (CS3) and continue to push the envelope using CamRaw’s features (e.g. recovery / fill light).
Sometimes, I will also take one of the exposures and use a layer blend on the PhotomatixTIF file, especially if the darks and lows are extreme.
Here are some examples:
http://flickr.com/photos/willishrinx/sets/72157600325694257/
Next time you come through Girdwood, stop by the office and I can show you an example, if you would like.
Great stuff from the Lower 48 ! Hope your house project is transitioning smoothly, and that you and Janine have a happy holiday season!
Author
Thanks Mark!
Sounds like I need to update my Photomatix, I’m still using 2.4. Thanks for the tips.
I may be in Girdwood for a day or two after Christmas, will you be in the office then? It would be fun to drop in and say hi.
Ron
Author
By the way, those are great shots Mark!
I will be in the office all week long – feel free to drop by !