From the category archives:

How to

Jim Goldstein provided me with an advanced copy of his newly released ebook book; Photographing the 4th Dimension – Time so that I would have an opportunity to provide a review.  I was more then happy to do so as I can’t remember ever seeing a photography book dedicated specifically to the concept of time.

I should start by saying I have known Jim for many years from the online photo community and telephone communications.  He is an excellent photographer and writer with a real eye for color and design elements – everything I have seen him produce is top notch.

Jim is a former Alaskan who now lives in the bay area.  On my trip to San Francisco a little over a year ago I finally had the pleasure of meeting Jim in person.  During that visit, it was Jim who gave me my first look at an Ipad, so I guess it was fitting that the first book I read on an IPad was his!

First, I gotta say a book like this on a device such as an IPad is really cool thanks to the extra multi media elements like embedded videos and live links to websites.   This makes reading a book an entirely new experience!

Now to the book.  It has a wonderful design with a perfect balance of real life examples including photos, videos and charts, along with accompanying text.  The book begins with a chapter on exposure which includes the best illustrations I have seen on the subject.  Next is an interesting discussion on human perception.  Then comes the main course with chapters on:

  • Long Exposures including light painting and star trails
  • Sequences – including images from different times of day and year, along with a section on time-lapse video.
  • Mixing Motion with Still Photography – including flash strobe effects and cinemagraphs (more on cinemagraphs later)
  • Gear – informative chapter on the tools of the trade.
  • Field Checklist -  A final section of helpful lists and charts they can be printed for easy reference.

The best chapter for me was the one on long exposure – this one is worth the cost of the book alone.  I have done very little with light painting or star trails, so to have suggested starting points for things like exposure will save a lot of time experimenting in the field.  I have never done a star trail image where I stacked multiple exposures, and I know this the best way to minimize noise with today’s digital cameras.  Jim doesn’t just brush over the technique, but goes into great detail with capture and post production processing even recommending helpful software programs.

For me personally, because of my personal experience the chapter on sequences was the least helpful.  But, if you are just starting out doing sequences – time-lapses in particular, this chapter will have you off and running in no time and will save you a lot of wasted time spent learning the hard way!

Now the other chapter worth the price of the book alone was the one on mixing motion with still photography.  The possibilities and the examples Jim provides of the use of flash strobe will keep the creative juices flowing for days.

But, what I found fascinating was the second section of the chapter covering the creation of cinemagraphs.  I have seen some really cool uses of this technique and never really knew how it was done.  If you don’t know what a cinemagraph is, here are a couple of Jim’s examples of cinemagraphs.  If you have a slow internet connection you might need to wait a bit for the motion to kick in.  The possibilities with this technique are endless!

So, all and all, I gotta say this is an excellent book covering a unique topic.  The concepts are laid out in a concise, easy to follow manner with lots of examples.  I definitively recommend this book, I think it could provide photographers of all ability levels with lots of creative ideas and techniques that should lead to hours of fun!


{ 0 comments }

Best Time Visit Alaska

by Ron on October 20, 2011

Late August and early September in Denali National Park - I think the best time for wildlife and landscape photogrpahy, and fewer visitors.

Late August and early September in Denali National Park - I think the best time for wildlife and landscape photography, and fewer visitors.

This is a frequent question – what is the best time of year to visit Alaska for photography?  It is a great question, and not one that is easily answered as it depends on where in Alaska you are looking to visit, and what types of subjects you are hoping to photograph.

Like most Alaskans, I certainly have my opinions on my favorite times of year.  Of course this is a very subjective answer in which not everyone will agree – if you think otherwise, share your thoughts – it adds to the discussion.  I must also admit I had a hard time ranking these and constantly changed my mind.  Really, for many of the prime months it is a 4 or 5 way tie, you can’t go wrong with any of them!

July

Maybe July is my top month because I began writing this in July.  :)   July brings long days of sun, lots of wildflowers and everything is very green.  It is the last of the “dry” season as well.  As one of the driest months on average;  the coast in Seward averages only 2.6 inches of rain in July.  That number will climb to over 10 inches by September.  Denali and Juneau average just over 3 and 4 inches for the month of July  respectively.

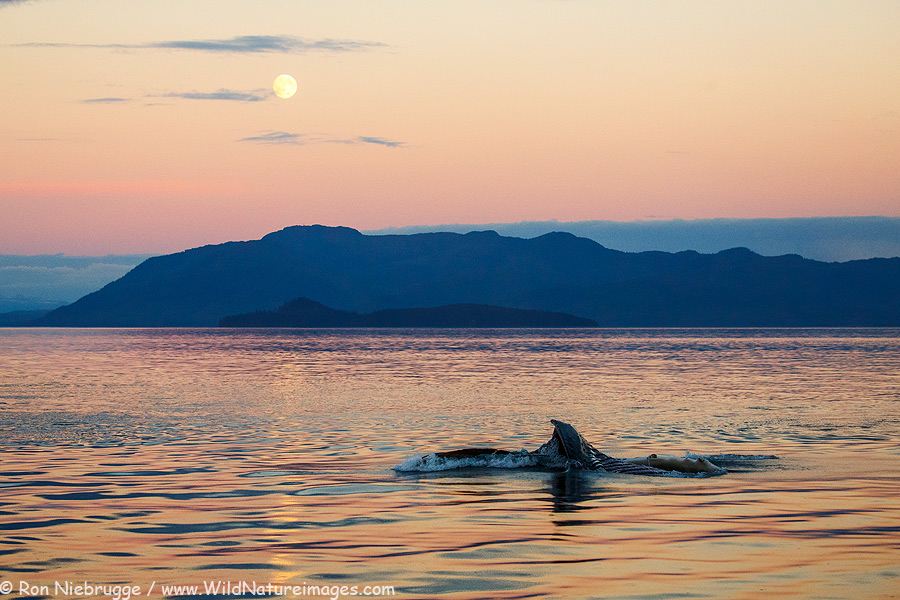
I would say July is the best time of year for travel type photography as the streets and many business are lined with colorful flowers pretty much everywhere from Juneau to Fairbanks.  It is also a wonderful time for landscape photography – everything is green and many wildflowers are in full bloom.  It is a decent time for wildlife photography, especially marine mammals.  Other mammals don’t look too good right now, especially the likes of sheep and caribou who will be molting their coats.

The biggest drawback to July is the crowds.  It is the most popular month, so count on hotels, campgrounds, RV rentals and restaurants to be crowded and expensive – reservations are a must.  Mosquitoes are also a drawback – they can be thick.  Especially in certain areas like the west end of the road in Denali or on the Arctic slope.

August

August is a wonderful transition month as we go from Summer to Fall.  In fact, the fall colors begin appearing in early August in the northern portions of the  Brooks Range, and will be nearing peak by the end of August in Denali.  The rest of the state is often covered with thick fields of fireweed – a wonderful, colorful foreground for landscape photography.  It is a bit wetter in August on the coast – both Seward and Juneau average over 5 inches of rain in August, although Denali drops to about 2.5.

Really August is great for landscape photography thanks to the fireweed, but it is also a good time for wildlife.  The racks on moose and caribou will be reaching full size, and will be dropping their velvet covering by the end of the month.  Other mammals like fox and wolves will begin putting on their thick winter coats.  The bugs aren’t bad in August either – mosquitoes are almost always gone by August 1.  There are some other bugs around, but I don’t think I have ever needed bug spray in Denali in August, although I have encountered bad mosquitoes in early August on the Arctic / North Slope.

The drawback to August – again the crowds.  It isn’t as busy as July, but it is still a peak summer month.

September

When we get nice weather in September I think they are some of the most beautiful days of the year!  Unfortunately in Seward and Kenai Fjords, we are just as likely to get a day with a half of inch of rain as a day of sun.  Seward averages over 10 inches of rain in September, while Juneau is over 7.  Denali drops to just over an inch and a half – in fact I love Denali in September, especially the first half.  The fall colors are absolutely amazing as the tundra turns bright red.  The wildlife looks its best – the fur bearers have their winter coats, and moose and caribou have full size, velvet free racks.  It seems like huge moose come out of nowhere for the rut activity.

Really September is probably the best time of year for wildlife photography, and one of the best for landscapes.  By the end of the month it can be one of the best times for Northern lights as well.  There are other advantage to September – the hotels, restaurants and cruise-lines are all still open, but not crowded.  You can often find good values and bargains this time of year, and usually can get by without reservations except for photographer popular places like the Wonder Lake campground in Denali.  Gee, maybe I should have listed September number 1.  :)

June

June is the tale of two halves.  Take Denali.  The first half is often a landscape of brown interrupted by streaks of old snow that hasn’t melted out of the gullies.  After September, the first half of June and late May is probably one of the best times for wildlife photography – lots of cute newborns along with a corresponding increase in predator activity.  In Denali, mosquitoes don’t begin to show until the second half, although they seem to be appearing earlier in recent years.  Now the second half of the month brings a wide variety of wildflowers – some very unique and beautiful.  The second half also brings the bugs and the visitors.

The same it true throughout Alaska.  Even down on the coast as far as Juneau it takes time for things to green up.  But, in mid June Alaska is awash in lush, green vegetation.  On the coast comes the first wave of wildflowers – the most notable are the fields of lupine that can be very plentiful in some years.

The visitor numbers make a noticeable jump in mid June – it goes from to somewhat quiet to July / August type of numbers, so you need to plan accordingly.  June is also one of the driest with average precipitation totals of 2.3 inches for both Denali and Seward, and 3.3 inches for Juneau.

May

May is like September in that most the visitor based business are now open, but aren’t very busy.  This is another great time to find travel bargains.  There are some unique photo opportunities in May, particularly the bird migrations.  Shorebirds, ducks etc., they are very plentiful.  Near the end of May is the beginning of the birthing season for many mammals – great for the cute baby animal opportunities, along with the predator activity.  It is also a good time for marine mammals, and you won’t have to worry about any bugs!  May is a fairly dry month, Seward and Juneau average around 4 inches of rain, with Denali receiving less then an inch.

There are some drawbacks to May – it isn’t that great for landscape photography, and it is difficult to get anywhere into the back-country.  Nothing has turned green yet, and the hills are full of dirty, rotten snow in which you can’t really ski or snowshoe, nor can you hike.  I find April and May frustrating in this way as it is the only time many of my favorite back-country trails are accessible.

March

March is a great winter month – growing up near Wrangell-St Elias National Park I used to say March was my favorite month of all.  We have lots of snow, long days and decent temperatures.  The snow usually has a nice crust layer – perfect for skiing, snow shoeing or snow machining.  It is funny how the same temperatures in November feel so much colder.  It is also a great time for travel photography thanks to events like the Iditarod.  Northern lights tend to be most active around the two equinox, so it is a great time for snowy aurora photos.

October

There are a few opportunities most notable would be the northern lights thanks to the fall equinox.  There is still plenty of wildlife activity – my favorite would be the swan migration.  But, it can be a wet, cold time of year – Seward for example averages 9.8 inches of rain during the month.  Leaves will be off the plants in most parts of Alaska, but hasn’t been replaced with snow.

Late September, October and November can be so nice in much of the lower 48 from Jasper to Zion, I’m rarely in Alaska during this time of year.  Couple the wonderful opportunities elsewhere with the somewhat limited ones in Alaska, and frankly unless you are specifically after northern lights, I would travel elsewhere during this time of year.

April

April is right there with late October / November as my least favorite time of year.  Unlike the fall months, in April you can count on finding plenty of snow, but it is often dirty and a bit rotten making it a poor subject for photography and a bit difficult to travel on.  Birds haven’t arrived yet, and bears are typically still holed up in their dens.

Now as a Alaska resident, April can bring lots of sunshine and warmer temperatures which can be invigorating.  And as an avid cross-country skier, I absolutely love the early morning crust skiing that is often found that time of year.  But, for photography purposes, I would rather be chasing wildflowers in the Southwest. :)

November / December / January / February

No surprise here, this is winter time in Alaska.  Of course you can find plenty of northern lights this time of year, but March and October tend to be better for aurora activity, and have more moderate temperatures.  If you are into winter activities, this is a nice time of year, and the winter landscape opportunities can be amazing.

The downside is the cold weather and short days.  You can find many of the same winter photo opportunities in March when you will have more moderate temperatures, and much longer days.


{ 14 comments }

Las Vegas Pictures

by Ron on January 28, 2011

Inside The Forum Shops at Ceasar's Palace Hotel and Casino, Las Vegas, Nevada

Inside The Forum Shops at Ceasar's Palace Hotel and Casino, Las Vegas, Nevada

We have updated what believe it or not is one of our most popular sections -our gallery of Las Vegas photos.  So check out the curved escalator on the left – didn’t know they could make moving stairs like that in a curve!

This is an HDR photo.  I usually don’t use this process because the results can look a little over the top unnatural, but it seems to work will on Las Vegas, probably because the place is a little over the top unnatural!

{ 9 comments }

Dark conditions like this scene from Seward earlier this winter is one time I can be "fooled" by the back of the camera preview.

Dark conditions like this scene from Seward earlier this winter is one time I can be "fooled" by the back of the camera preview.

Samantha Orchard provided me this Ask Ron question:

Do you check the in-camera histogram and/or the overexposure warning
option (blinking pixels) after you take a photograph? Or do you just look
at the image on the screen to determine if you need to use exposure
compensation, take exposure-bracketed shots, or otherwise re-adjust your
camera settings when you try the shot again?

Great question.  I set my camera to blink when there are flashing highlights – a camera setting available on many cameras.  Looking for “blinkies” is one of the first things I will do when evaluating an exposure as this represents lost data.  If I need to, I can usually recover detail in an underexposed area, but never in an overexposed “blinker”.

But, I try to always look at the histogram making sure the “mountain” of data isn’t getting cut off by being too far to the right (overexposed), or too far to the left (underexposed).

If I don’t look at the historgram and just judge exposure by how the image on the LCD looks, I find that I will often underexpose the photo when I’m working in dark conditions, presumably because the screen appears so bright compared to my dark surroundings.  Likewise, if it is really bright out I have trouble seeing the image on the back of the camera unless it is overexposed – so I find I tend to overexpose.  With the histogram I get a more objective measure of exposure – one that isn’t influenced by the viewing conditions.

If you have any questions about photography / locations etc., then you might want to check out Ask Ron.

{ 15 comments }

About a year ago I wrote a post on sensor cleaning for digital cameras.  What I didn’t say at the time – I was really hoping I would be cleaning my sensor for the very last time because I was going to begin testing a prototype product that would protect the sensor from dust.

Well after one year I’m beginning to think I may never need to clean my sensor again!  I love this product!  Unfortunately, it hasn’t been available to the public until recently so I  had to wait until now to write about it.

So the product is called Dust Shield and is made by Dust-Aid, the company that makes the great cleaning products I wrote about in my Sensor cleaning post.  Effectively the product is a clear optic filter that is placed over the opening to the camera’s chamber sealing off the chamber and sensor.  This product has a number of advantages – some not so obvious:

  1. The main advantage is clear – by sealing off the chamber I am able to prevent dust from ever reaching the sensor.  I should add, before installing, I went to great lengths to completely clean the chamber including the sensor and mirror – otherwise every time the mirror flipped up and down I was afraid it would just reposition existing dust, possibly onto the sensor.
  2. When working in a dusty environment the camera is still going to pick up dust, but now it lands on the Dust Shield instead of the sensor.  The selling point behind the Dust Shield -  it is far easier to replace the shield then clean the sensor.
  3. But here is an advantage I didn’t anticipate.  What I found is dust was far less likely to show when on the Dust Shield.  I believe this is because the dust is now landing a fair distance away from the sensor, it just doesn’t create ugly black spots like it does when it lands on the sensor.  I’m always surprised at how little spots or scratches on filters aren’t viable on the final image – I believe the same principle is at play.
  4. When it does get dusty, the Dust Shield is far easier to clean then the sensor – usually a couple of puffs from a hand held blower and I’m good to go.

Of course I know what everyone is thinking – what does it do to image quality?  I gotta admit, I was skeptical.  Having spent some $8,000 on one of the finest cameras available, and a bunch more on top quality lenses – I did not like the idea of now adding a piece of film to the image path.  My photos are our sole source of income, I just can’t  sacrifice quality no matter how convenient!  I had to be sure image quality didn’t suffer – here is my review.

I felt the best way to really test this product is with my absolute sharpest combination of equipment.  So I mounted what I think is my sharpest lens, my Canon 100 macro, on my best camera, a 21 mp Canon 1DsIII.   I used the two second timer with mirror lockup with a  f-stop of /8, – probably about as good of a combination as I could get.  I then mounted the whole thing on a monstrous Gitzo 1548 tripod, placed a bean bag on the camera and photographed a dollar bill taped to the wall.  If I couldn’t detect softness with my best setup, then I’m not going to see it with say a lessor camera or with a softer lens like the 100-400.

Full frame version of the dollar.

Full frame version of the dollar.

For reference, here is the full-frame version of dollar.  The red represents the area in which I cropped a 400×600 area of the image with the results displayed below the jump. [click to continue…]

{ 31 comments }

How do I capture so much depth of field?

by Ron on December 17, 2009

Pedersen Glacier, Kenai Fjords National Park, Alaska.

Pedersen Glacier, Kenai Fjords National Park, Alaska.

It has been awhile since I have answered any Ask Ron questions.  As a reminder, I will answer any photography question as best I can.

A couple of weeks ago I received this question:

I love how you capture a foreground, middle ground background with such great depth.
Do you typically try to accomplish this with a 24 T/S or the 24 1.4L?
Thanks, Ray

To answer your question, yes I do use Canon’s tilt shift lenses a fair amount.  By tilting the plane of focus I am better able to position the depth of field from near to far without sacrificing a lot of shutter speed.  I go into more detail in this post on tilt with Canon’s tilt shift lenses.  These lenses are especially valuable when you have something really close, say within a couple of feet, and still want to keep distant objects in focus.

But, I don’t use those lenses as much as I should.  It is so much easier, faster and lighter to carry one 24-105 then three tilt shift lenses.  In these circumstances, I use a small aperture to maximize depth of field – usually around f/16.  I then focus about 1/4 to 1/3 of the way into the scene.  I also almost always will use a tripod, mirror lock up and the 2 second self timer to minimize any movement as much as possible.  This is about as good as it gets without tilt.  If something still has to be a bit out of focus I would rather it be distant objects – I believe prominent foreground elements have to be sharp – distant objects like mountains can be more forgiving.

Tomorrow I will answer another recent question on depth of field – this one regarding bokeh.

{ 11 comments }

How to bid on Hotels with Priceline

by Ron on September 1, 2009

We have been fortunate enough to stay at some of the fanciest hotels in North America in places like Palm Springs, San Diego, Orange County, Los Angeles and Vancouver, and have almost always paid less then $100 per night, sometimes much less.  So how do we do it?  Easy, by naming our own price on  Priceline.com [click to continue…]

{ 7 comments }

A ferris Wheel at night, Long Beach, California.

A ferris wheel at night, Long Beach, California.

Well I hate to post the same photo twice, especially in the same week, but in response to my ”ask Ron” request, this was the most asked question.  More specifically, Dennis Barton wanted to know how many tries it took to capture this image, while Sheri Lyons wondered how the photo came to look like this. [click to continue…]

{ 7 comments }

Legal Advice for Photographers

by Ron on April 16, 2009


Palm Trees at sunset, Newport Beach, California.

Palm Trees at sunset, Newport Beach, California.

Let me start by saying, you shouldn’t get your legal advice from friends and fellow photographers.  Having said that, let me offer some advice.  :)

The place I turn to when I have questions is the Photographer’s Legal Guide by Carolyn Wright.  The book covers most of the legal issues one might encounter when dealing with photo business and photography issues such as copyrights, model releases, insurance and paperwork.  I think most photographers will find it very valuable. 

I have known Carolyn for a number of years now and consider her a friend – she is a wonderful person, and as a fellow photographer, she understands the industry and issues photographers face.  We have hired her on occasions when we needed large contracts reviewed, and also successfully used her for a copyright infringement suit – who better to hire then the person who wrote the book!  [click to continue…]

{ 3 comments }

Singh-Ray Blog

by Ron on April 14, 2009

Dry Lake Bed, Anza-Borrego Desert State Park, California.

Dry Lake Bed, Anza-Borrego Desert State Park, California.

I have been a long time user of Singh-Ray filters, particularly their graduated neutral density filters.  So I must say I was honored when they approached me recently and asked me to contribute to their blog.  In fact, I already had the first post written in my head, as  it was a tip I thought I would post here.  Instead, I shared my discovery of the usefulness of using live-view in the positioning of graduated neutral density filters.  Well I don’t want to spoil the whole post, you can check out the whole story at the Singh-Ray blog

As far as my own blog goes, I still may do some fine tuning of the header, photo size etc., so if things look a bit funky from time to time, you will understand.

{ 8 comments }

Sensor Cleaning for Digital Cameras

by Ron on December 9, 2008

A kayaker enjoying a beautiful afternoon this past Sunday on Resurrection Bay, Seward, Alaska.

A kayaker on Resurrection Bay enjoying a beautiful afternoon this past Sunday, Seward, Alaska.

A couple of months ago I wrote about a sensor cleaning liquid and wand product made by Dust-Aid.  I really like the wands, they made it easy to get the moist swaps into the champer and allowed me to reach the corners of the sensor.  But the real benefit to me was the fact this liquid could be shipped via air to places like Alaska.

Well I just tried another product that works even better!  In fact, I was able to clean my sensor with just one try in just a matter of minutes!  [click to continue…]

{ 8 comments }

Camera Plates and L Brackets

by Ron on September 10, 2008

Ballhead Clamp 

Pictured is a quick release clamp on the top of a BH-55 Ballhead.

Trying to attach your camera onto the threaded post you find on top of many tripods, is a slow, awkward process that will have you leaving your tripod in the car.  By using a quick release clamp on your ballhead (pictured above), makes attaching your camera, or lens a quick and easy process.  All you need is the corresponding metal camera plate mounted to the bottom of your camera, or any lenses that may have a tripod mount.  [click to continue…]

{ 9 comments }

Digital Camera Sensor Cleaning

by Ron on September 3, 2008

 Alpenglow

This was from last Saturday in the Chugach National Forest, about 12 miles from Seward, Alaska.  I used two graduated neutral density filters – one on the mountain, the other for the reflection.

Sensor dust can really show in images like this where you have a uniform color as you do with the sky, and when you are stopped down, because the increased depth of field helps to show your dust spots. [click to continue…]

{ 7 comments }

Ballheads

by Ron on May 29, 2008

Really Right Stuff BH-55 Ballhead

When you are photographing wildlife, or pursuing fleeting light, it often seems that speed and efficiency are paramount.  For this reason, I prefer to use a ball head for a tripod head. [click to continue…]

{ 2 comments }

Tripods

by Ron on May 27, 2008

 Tripod

I figure there is no better place to start my nature photography lessons then with what I believe is the single most important piece of equipment; a tripod.  I have written about this before, and at the risk of sounding repetitive and redundant, :)  I would like to repeat the numerous advantages: [click to continue…]

{ 8 comments }

Luminosity Masks – HDR Revisited

by Ron on January 6, 2008

Zion Road

The road through Zion National Park, Utah.

Our eyes have the amazing ability to see details in the shadows of a scene, and the details in the highlights at the same time.  Our cameras can’t begin to capture what our eyes can see.  Photographers have been trying to replicate what our eyes can see with a camera for years – these techniques are usually referred as High Dynamic Range (HDR) photography.  Fancy words for a simple concept – makes us sound smart. :)   [click to continue…]

{ 4 comments }

Luminosity Masks

by Ron on January 4, 2008

Horseback Riding in Grand Teton National Park, Wyoming.

Horseback riders this past fall in Grand Teton National Park, Wyoming.

If you followed the link in yesterday’s post on saturation masks, you will realize Tony also offers actions for something called luminosity masks as well.  This is another subtle, but powerful tool that frankly I haven’t mastered and rarely utilize, but I plan to spend more time trying to master them over the next month as we begin to adjust our autumn photos.

So why discuss it if I don’t use them yet?  Well, I have recently discovered another use for these masks that make them much more valuable, but I will save that for the next post.  Again, this is a relativly advanced topic that won’t interest everyone. [click to continue…]

{ 0 comments }

Saturation Masks

by Ron on January 3, 2008

Beavertail Cactus

I recently discovered a wonderful new Photoshop tool – the use of saturation masks.  This is somewhat of an advanced tool – if you don’t use layers and masks in Photoshop (you should), this won’t make much sense, but I do believe many subscribers here may find it useful. [click to continue…]

{ 9 comments }

Kayaking in the Tetons

I have received a number of emails lately asking for more of the details behind each photo.  It is a good suggestion, and I have promised to do just that on occasion.  What I thought might be interesting would be to share my detailed thought process behind a single image.  I decided to do that with this photo from our spring trip.  I think some people might be surprised all that goes into just one photo. [click to continue…]

{ 4 comments }

Aurora photo

Yesterday I wrote about finding aurora borealis, today how to actually photograph the aurora Borealis.  [click to continue…]

{ 71 comments }

Finding Aurora Borealis

by Ron on December 18, 2006

Northern Ligths

I thought I would share some tips for photographing the aurora borealis, also known as northern lights.  The hardest part of photographing the auroras is finding them – so today I thought I would write about finding them, tomorrow actually photographing them.  [click to continue…]

{ 22 comments }

HDR Photography

by Ron on November 16, 2006

Barber Cabin, Lower Russian Lake

In my last post I wrote about using graduated neutral density filters to overcome scenes with extreme dynamic range.  If there isn’t a nice straight division, filters aren’t much help.  In these situations, I have started using a process referred to as high dynamic range photography, often called HDR photography.  This is the process I used to capture this image of the Barber Forest Service Cabin at Lower Russian Lake, Alaska.

[click to continue…]

{ 8 comments }

Graduated Neutral Density Filters

by Ron on November 14, 2006

Pedersen Glacier, Kenai Fjords National Park, Alaska.

This is how I saw Pedersen Glacier in Kenai Fjords National Park, Alaska.  But with out a graduated neutral density filter or a similar tool, my camera would have not been able to capture the photo.

[click to continue…]

{ 20 comments }

Winter Photography, 8 Great Tips

by Ron on November 13, 2006

Chugach National Forest, Alaska during winter.

Winter is a wonderful time for photography.  I thought I would provide a few tips to make photography in the cold more successful.

[click to continue…]

{ 57 comments }

Taking Better Pictures

by Ron on August 15, 2006

Ever get back from a vacation and been frustrated with your pictures?  It is a common complaint.  Here are some general tips that I think can help many people take better pictures:

1.  Use a tripod.  I know, they are a pain – it is so much easier to just hand hold the camera.  But not only does using a tripod give you better picture quality by stabilizing the camera - it also forces you to slow down which is the next tip.

2.  Slow Down.  Take your time and really think about your picture, the composition and all the elements.  Instead of rattling off 5 mediocre pictures, spend the time to take one good picture.  This is where a tripod can come in helpful.  [click to continue…]

Related Posts Plugin for WordPress, Blogger...

{ 7 comments }